Showing posts with label border punches. Show all posts

Tuesday, August 5, 2014

Mini Album

Hi guys. Today I want to show you a project I've been working on the last two days. I found this great tutorial for a mini album on Pinterest. I've tried making a mini album in the past (love the whole idea of it cause it's like a mini scrapbook...with a twist...cause you have to actually open flaps and stuff)...and they're so cool! ...but they never turned out quite like I imagined. This project was by far the easiest mini album I've tried so far...and I absolutely love the final result. :)

I used a Stampin' Up paper pack that I've had in my stash for awhile now. It was perfect...and I love all the different papers. The ribbons are also from my stash (some are Stampin' Up, some are just from the local Dollar Store). And of course I had to use some border punches. I think these ones are called "Arch Lattice" by Martha Stewart and "Daisy" by Fiskars.

So here's a look through the mini album. I'll more than likely add more embellishments once I add my photos...but I think you'll get the general feel of the album.

This is the front. It's still missing the title and the photo...

The first fold opens upward:

There are two pockets along the side that holds the two photo mats. The mats themselves are double sided...so there will be a total of four different photos.

On to the second "page"...
         this tag and photo mat are stuck down...so no removing...

but then you flip up the right side...to find two more photo mats.

Moving on to page 3...
     This is the most "hand's on" page. It has three different pockets that hold either tags or photo mats.

First off...there's a big photo mat in a pocket on top of the left page. This mat is double-sided...so there will be two big photos.

Then there's obviously the two tags in the front of the left page. The tags have space for a photo in the back...which I'll probably end up turning around. So my photos will be shown...with journaling on the back. But I figured with no photos to display yet...I'd show the "journaling" side of the tags.

Finally, there's a two-sided photo mat in a pocket on the right page as well. Space for two different photos.

And when you close the book...this is the back view.


Have I inspired you to try one of these for yourself? Here's the link to a great tutorial. It's not complicated at all...and it's made from a basic 12x12 sheet of paper (cardstock or printed -- though I'd suggest you go with a two-sided thicker paper 'cause then you have the background papers already there...and just have to add the tags and the embellishments.) But that's all up to you. :) Enjoy! :)


Challenges:

Wednesday, January 9, 2013

Tea Light Candle Card

Hi guys. Today didn't go quite like I had originally planned (and it's not even half over yet!), but it left me with some time at my crafting table. I've wanted to try my hand at making a "Tea Light Candle Holder card". These cards are super cute -- and they're a card and gift all-in-one! How cool is that!??

I found a tutorial on Split Coast Stampers...and set out to try it. There's really not a whole lot to these cards -- just some cutting and scoring. Pretty basic...and very fast to make, despite how complicated they look!!! :)

I started out with some glossy gold cardstock. I scored and cut as the directions indicated in the tutorial. Then I folded it up and stuck it together using some adhesive (added my 3 scented tea light candles first of course).

Using the Fiskars spring Limited Edition Butterfly border punch, I punched a black border and then attached it to the side of my card flap. Then, I inked up a Sweet Stamps "Fanciful Butterflies" punch and stamped two butterflies onto some white cardstock, which I then layered onto some black cardstock. Finally, I also inked up a Fiskars clear stamp sentiment, which I also layered onto some black cardstock.


Using some stamp dimensional foam, I attached the images to my card base.


As you might have noticed, I stamped the 2 butterfly images slightly off the white cardstock. I thought it might be interesting to add more dimension to the card by adding some cut out butterflies on top of the images.


Stamping the same butterfly image onto some white cardstock, I cut out two butterflies and blinged them up a bit.


Finally I attached these butterflies onto my stamped cardstock...lifting the wings off a bit, so they have some dimension.


And my card was complete! It turned out super cute -- and I know I will be making more of these types of cards in the future! They're fun...and just a little something extra. :)


Well, give it a try yourself. You don't have to make a tea light candle holder if you're not into candles. You can fill the little tube with whatever you want -- whether it be candy or some other treats! The possibilities are endless!!! Have fun! :)

products used:
Fiskars Trimmer
Fiskars Spring Limited Edition Butterfly Border Punch
Sweet Stamps "Fanciful Butterflies" stamp
Fiskars clear stamp (not sure of the name)
Bling from stash


Challenges for my card:


Also, I want to share with you a GREAT giveaway! Trudy, over at "True Gifts from the Heart" is celebrating her 4th blogaversary on February 4th. To celebrate, she is sharing with one of her followers (old or new). Check out the prize package! Wouldn't this be fun to win??? :)


Monday, December 17, 2012

3 Wisemen

Hi guys. Yes, I'm back again to show off another Christmas card. I've had this stamped image in my stash for two years now, and finally decided it was time to use it! It's about time, eh?


I didn't want to do a whole lot with the background, cause I wanted the stamp to be the focus point.

Just added some punched borders and matted it on my white embossed cardstock. Not too much to this one, but I like it. Let the image do all the work...

Here's the full view:


supplies used:

Cuttlebug Folder: Argyle
Fiskars punch: Lace
Bling from stash
Stamped image from stash (not sure what it's called)


Challenges for this card:

Friday, October 26, 2012

3rd Orange Blog Hop

Hi guys! Are you ready to get hopping???

Welcome to the Fiskateer 3rd Annual Orange Blog Hop

If you're hopping along, you should have come here from Emily's blog. If you just stumbled across the hop, go to www.fiskateers.com to start from the beginning.

Today we are celebrating Fiskar's signature color, ORANGE. Almost everyone is familiar with Fiskars' famous orange-handled scissors, but Fiskars makes so many other wonderful products for crafting, sewing, gardening and much, much more. Each stop along our hop will feature different Fiskars' products with a big helping of ORANGE!

You don't want to miss ANY of the participants! There's lots of inspiration to be found along the stops -- plus some prizes as well. :) Check their directions carefully to participate.


Now on to my project....

I decided to go a different route than a card for this blog hop. I've wanted to try make a card box for giving away the cards I make. It's been on my "to do" list for like forever...but I didn't have a scoring tool. Luckily, my Fiskars trimmer also has a scoring blade, so I'm all set now. :)

There are a lot of different kind of project you can make to hold card, but I like the A2 Card Box look the best. Plus, it holds a lot of cards...so that's what I decided to try making today...

I found a great tutorial at Split Coast Stampers for the A2 card box. TUTORIAL LINK.

First I made the bottom box. Using my Fiskars Trimmer, I cut and scored the cardstock as the directions indicated...


Then I cut and scored my designer paper as well.

I then used the Fiskars "Effervescence" border punch to punch all the way around the designer paper. The designer paper is the top of the box -- I left the plain orange (bottom) as it was. No extra punching.  


Using double-sided tape, I glued the sides together...and the box was complete! :)


It's really not that difficult to make! Very simple steps to follow...and you could have a box to fill with envelope/cards or whatever other kind of goodie you want to send! :) Just click on the tutorial link above and try your hand at one of these A2 card boxes yourself!


So that's my project for the day. I hope you have been inspired to try a new idea for yourself! :) Thanks for coming by my blog today. It's been fun! :)

For more information about Fiskars and the Fiskateer program, you can go to http://www.fiskateers.com/join. Now, hop on over to Kelly's blog to see what great project she's come up with.

And if you get lost along the way, here is the complete list of the blog hop.

Emily K #7021
Divinity #6688  You are here!

Enjoy the rest of the hop! And good luck! :)


challenges for my project:

Tuesday, September 18, 2012

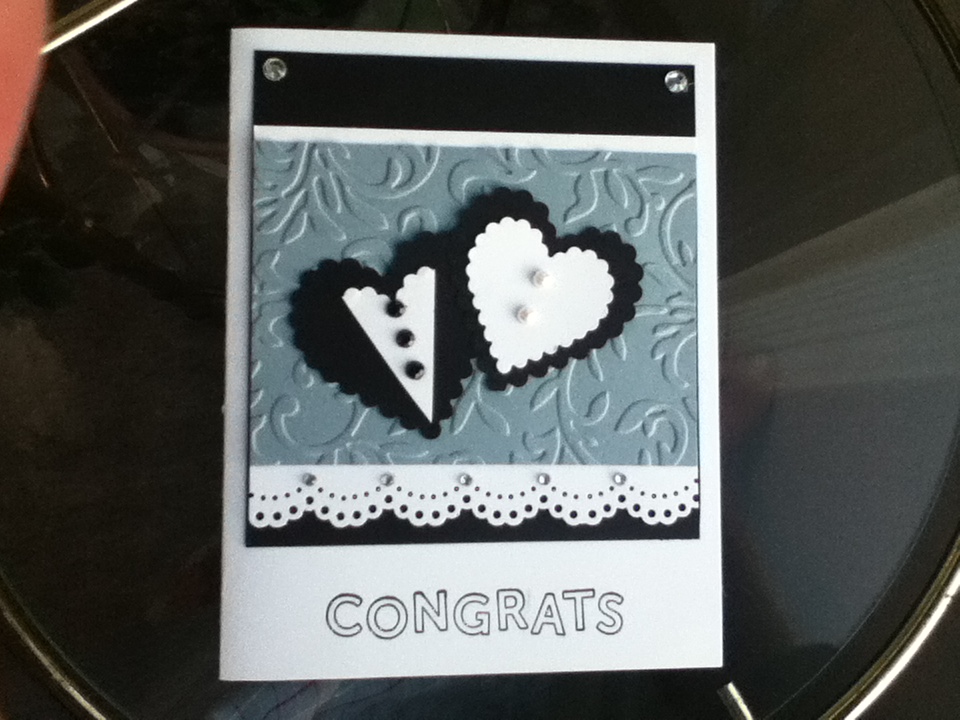
Another Wedding Theme

Hi guys. It's been awhile since I've posted...buy it's summertime...which gets really busy around here...and there's not a whole lot of time spent at my crafting table. But every now I then, when I need a break from the other activities and stuff, I head on over there and make a card or two.

Here's one I lifted off a wedding card I found online. I loved the idea of the hearts being the bride/groom, etc.


 I must say, it turned out better than I thought it would -- even if I only had a Scalloped Heart punch and I wanted a plain-edged heart. It worked out either way. :)


Thanks for  stopping by. Hope your summer is fun-filled...just like it's suppose to be :)


Thursday, August 30, 2012

Summertime Birthday

Hi guys! I finally sat down at my scrap table for a few hours and got some more cards made! Whew! (I've been seriously lacking mojo lately, so it was quite the challenge!)


For me that typically means a few flops for cards, but it didn't happen! I guess taking a break for a month worked. LOL  


I borrowed a few stamps from a friend, and tried some new ideas...


This card is quite simple, but the color combo still makes it jump off the page somehow. There's something about blue and yellow  -- vibrant, happy and just plain playful. :) A perfect combination for a Birthday card during the summertime. :)

 Here's a look at the finished card:


(the dark blue bling on the flowers didn't show up on the photo, but that's just little details. Typical, I guess -- it looks even better for real! LOL)

Thanks for dropping by -- and have a happy, summery day. :)


challenges: 

Everybody - Art Challenge: Anything Goes
My Time to Craft -- Milestone Birthday
Simon Says -- Anything Goes
 Forever Friends -- Anything Goes
DL Art -- Birthday

Monday, April 23, 2012

Black White & One

Hi guys. Here's a look at another card I made using the Upsy Daisy stamp set by Stampin Up!.  This stamp set has six different sentiments -- and I've absolutely loved playing around with it. :)


This time I only inked up the image once. There's definitely something wonderful about silhouette images -- love them! :) Especially flowers. (something on my "to buy" list for sure!)


I once again used my Cuttlebug to create the textured background. This folder is called "Victorian" and it's one of my favourites. so pretty! I used the Fiskars Effervescence border punch on my red "accent" colour paper....to give the card a little more detail. I just love border punches! :) And finally I added a white sheer ribbon...which I won (could have been from RRR??? I'm not quite sure anymore -- but it's the last of it, so I have to get more! Love it! :)


I'm entering this card into Really Reasonable Ribbon's Challenge:
    >>  Black, White and One Accent Color plus a Ribbon

Paper Playtime -- Birthday Card with Sentiment
Stamptacular Sunday -- Layers
Go Fish Challenge -- Anything Goes
Bearly Mine Challenge -- Embossing
Whimsy Stamps -- Punches and Die Cuts (used a border punch)


Saturday, March 31, 2012

Love Always Layout

Hi guys! Today I'd like to tell you about a new challenge blog I found. I love these challenge blogs, not just because they do have GREAT prizes, but also because I get inspired by the projects the DT post...and the other bloggers who enter the challenges. It's very cool to see how many different ideas you can get from a simple theme like "Flowers" or "Sentiments only" , etc. I love it! :)
So on to the challenge blog. It's called "Unique Crafter's Challenges". The challenges last for a month...and then they have a draw for a great giveaway! :) Like wow!!! :)


This month the challenge is "Anything Goes". That's pretty simple, eh??? So basically all you have to do is link up your latest project....and you get entered to win the prize! Totally cool. You can enter up to THREE different projects.

Today I am entering a scrapbook layout that I made for an 8x8 album. It's very simple scrapbooking, but I've come to realize that pages can be over-stuffed with embellishments, pictures, etc. I tend to stick to simple pages that let the pictures do the talking...cause for me that's the whole idea of scrapbooking in the first place! :)
Here's my page. It's a two-page layout.

close ups:


Details: 

   ....I hand doodled the butterflie's path...

   ......the quote is a rub-on.......

....I used the Fiskars "In Stitches" border punch to create my own film strip. :)

used:
Colorbok Paper & embellishments
(not sure about the dotten paper)
Fiskars "In Stitches" border punch
rub on quote
Clear/White Bling! :)

As always, I love showcasing great giveaways I find on blogs I follow. It's a chance to win some FABULOUS crafting goodies -- for free -- and it's soo easy to join. All you have to do is go to their blog, and follow the "rules" they have set up for their giveaway. Simple. Easy. And you could be the lucky winner as they are all random draws! How cool is that! :) Here's what you could win:


Interested??? Head on over to The Crafter's Reference Blog and add your name to the linky :)

Friday, March 23, 2012

Fiskateer Spring Blog Hop

Hi guys! You ready for another blog hop??? I love them! I've participated in so many -- (won a few prizes here and there) and just altogether had a great time...and of course was inspired by the bloggers' creations. So hopefully this hop will do the same for you! :)

Welcome to the Fiskateers Spring Blog Hop

You should have come here from Michelle over at Scrapbooking SOS. If you are hopping into the middle of our blog hop and you are a Fiskateer, you can start here www.fiskateers.com.

 If you are thinking a “Fiskawhat?”, you should know that Fiskateers (www.fiskateers.com) is an online community of craftiness (paper crafts, sewing, gardening, etc.) all based around our love and appreciation of Fiskars (think orange-handled scissors to start).There is a blog, gallery, and message board led by four lovely Lead Fiskateers who along with the other Fiskateers are fabulous at getting creativity flowing via chats, challenges, on-line crops, and interviews with other crafty celebrities.If you would like to join in the inspiration of Fiskateers, or would like to learn more, simply go to www.fiskateers.com/join and join.Then, join in the fun at the beginning, www.kellystarsallthingscrafty.blogspot.com
We'll be hopping all weekend, March 24th and 25th to welcome spring! The blog hop officially ends on Sunday March 25th at 11pm CST. Some Fiskateers are offering sur-prizes...check their directions carefully to participate. If you get lost along the way, here is the complete list of the blog hop.


Kelly 6446 (and PattyB 2262)www.kellystarsallthingscrafty.blogspot.com

Jennifer Ashley 6361 www.asecretvintage.blogspot.com


Courtney 8459 (and Shelley 8356)www.youwillwontyou.blogspot.com


Pamela 8040 www.cottagebelow.com 


Emily 7021 http://emily.kincke.com/fiskateer-spring-blog-hop-giveaway/ (this website is very secure because it is owner maintained, you can read the certificate then simply click continue/allow to head on over to my post)


Whew! That's quite a list of bloggers, eh??? Now on to my creation.

It's springtime! I love this time of the year! Despite all the rain and mud...it's one of my favorite seasons. I love the first spring shower....the feeling I get when I see the first rainbow of the year...or smell the freshness of the air. And of course, best of all, the flowers start to bud. That's enough to put a smile on anyone's face. :)

With that in mind, I put together a card that represents "springtime" to me.


Yes, there's lots and lots of layers! :)


This card was so much fun! I made the "pot" myself -- inked the edges to make them stand out more. Then used some very old pre-punched flowers (from the Dollarama, which is an awesome dollar store here in Canada). The leaves are punched with a Fiskars mini punch...which I hadn't really found a purpose for before. Glad to finally find a way to use it! :)


Of course I Cuttlebugged the background papers:
"Distressed Strips" folder for the white paper and the "Swirls" folder for the yellow).


The borders along the sides were punched with the Fiskars "Effervescence" border punch. And finally, the buttons and bling were in my stash. :)
So that's my "spring" card. Now hop on over to Cindy's Blog to see what wonderful project she has to show. Enjoy the rest of the hop. :)

Thursday, March 15, 2012

Butterfly fly away

Hi guys! I'm back to showcase a new card I made this morning. It's a quick one -- using a template from before, that's quick and pretty. :) Plus, it combines my Cuttlebug, Fiskars border punches...and stamping! There's not really a whole lot that can go wrong with a card that includes that combination! :)

I won a clear stamp set from a blog candy about a month ago (sorry, I'm not sure what blog!). The stamp is a cArt-Us butterflies set! Like wow! I was sooo impressed! Give me butterflies -- anything! -- and I`m happy! There`s just something about butterflies that make me smile. :)

So today I used one of my new stamps to create this card. It turned out a little on the monocromatic side. Added a bit of pink along the sides, just to give it a little bit of color. whatcha think???


Supplies used:
Cuttlebug Swirls Folder
Fiskars 'Lace' border punch
Fiskars Black Pigment Ink Pad
cArt Us butterfly clear stamp

challenges I entered this card in:

 
and before you go, I want to tell you about a great giveaway you can sign up for. It's at A Mermaid's Crafts -- an absolutely awesome and generous prize! So go sign up for her blog, and the giveaway. Remember: you can't win it,  if you don't try!!! :)


thanks for dropping by! have a crafty day! :)


Wednesday, February 29, 2012

Back with a Baptism Card

Hi guys. I can't believe it's been so long since I've posted anything! I don't have a camra around these days (other than my ipod) which has kind of been keeping me from showcasing new cards. It's definitely something I've had to get used to -- and after a couple weeks of not posting, I've decided to give my ipod camra (low quality photos) another shot. I'm sure you'll get the basic idea of the card, and hopefully I'll get some better photos of my cards soon so I can showcase them better.

So enough about that. :p On to the card...


This card is for a friend's baptism. A lot of young people in my church are getting baptized around Easter time....so this time each year has me making lots of baptism cards. It's a good thing my mojo is in good form right now -- 'cause I don't really like to make too many of the same cards (although mass production of a select few favourites always does happen).

I actually picked up this paper from a garage sale last year, so I honestly don't know what the line is called. But whatever it was, I absolutely loved it! :) The coloured paper on the first layer actually has a print on it, but it's so faint you hardly notice it. Out of curiousity I put it through my cuttlebug to see if it would look good even if there was a pattern on it, and I was impressed with the results. I actually cuttlebugged the whole sheet 'cause I loved the look so much! But after trying it with other printed paper, I quickly discovered that the end result is not always as great. I would suggest using only plain cardstock or only lightly printed paper when you cuttlebug.

The cross stamp is from a stamp set called "The Glory of Easter" that I won last April (right after Easter of course). It's been sitting on my shelf for close to a year now, and I was so excited to finally have a reason to use it. I absolutely love love love this set!

I borrowed the border punch (fiskars Apron Lace border punch), which is one of my favourites. I seriously need to get to a Michael's Craft store soon so I can buy some supplies and punches. It's amazing how difficult that is at times! :p

Anyways, thanks for taking the time to come visit my blog. I'd like to encourage all my readers (once again) to follow my blog using Linky Followers since the Google followers is apparently supposed to stop working as of tonight! :( So link on up -- I don't want to lose my faithful followers!!!!!!!!!

And one last thing...

make commenting on your blog postings easier


Scrapalicious USA -- Anything Goes
So Many Cards -- Punch it!
2 Sisters -- Anything Goes
Everybody Art Challenge Blog -- Monocromatic
Simon Says Stamps Challenge -- Anything Goes
Always Crafting -- Anything Goes
Party Time Tuesday -- Anything Goes
Stamp and Doodle -- Embossing of any kind!

Friday, February 3, 2012

silver hearts

Blogland is covered in hearts!! or have you noticed it yourself??? Well, Valentine's Day is coming up in 12 short days! (I thought the new year just started...where has the time gone!!??)

So I decided I'd join the party. I  had some heart stamps lying on the shelf that I've been meaning to use...and haven't gotten around to it. I stamped and embossed them with silver embossing powder. I'm always amazed at the whole new look a stamp gets when it's heat embossed. Of course since I had the Fiskars heart border punch on my shelf I had to use that one as well.

here's my card:


And just to give the card a special touch, I decided to "dress up" the inside of the card as well. It turned out a lot better than I thought it would.  :)


And yes...I had to add some butterflies to the card as well. Butterflies are romantic, right??? Well magical at least.... :)


I think that's enough hearts for one card, eh???  TFL :)

...or not. (I stamped another two tiny ones on the back of the card...just 'cause!) LOL

Thanks for dropping by....and have a good and crafty day.
God bless you :)


Sentimental Sundays -- Dry Embossing
Paper Sundays -- Valentines
Tip Top Tuesdays -- Valentines
Joanna Sheen's Challenge Blog -- Love is in the Air
Inky Impressions -- Use Pearls and/or Bling
Die Cutting Diva's -- Anything Goes
Little Miss Muffet Challenges -- Love and Valentines
Digi Doodle Shop -- Love is in the Air
Totally Stampalicious -- Keep it Clean and Simple
Lolipop Crafts -- Anything Goes
Oldie but a Goody Challenge -- Have a Heart
Party time Tuesdays -- Anything Goes
Truly Scrumptious - Love and Hearts
Anything Goes Challenge Blog -- To the One I Love
Crafty Sentimental Designs -- Punches and/or Dies
Ladybug Craft Ink -- Loves Me, Loves Me Not
The Stamping Boutique -- Valentines
Stamp N Doodle -- Love, Romance and/or Valentine
Paper Make Up Stamps -- Be My Valentine
Corrosive Challenges -- I {Heart} You
The Paper Shelter -- Love is in the Air
Diva's by Design -- Anything Goes